前回の内容はこちらから「第2回 Amazon Rekognition 環境設定(2/2)」
今回は動作確認(Python)を行ってみたいと思います。
Pythonの環境の準備ができましたら(インストールはhttps://www.python.org/から)
AWSのSDKをインストールしてください。
参考サイトAWS SDK for Python (Boto3)
Amazon Rekognitionにはいくつか種類がありますが、
今回はイメージ内のラベルの検出(DetectLabels)を行ってみます。
・Pythonサンプルソース。
# インストールしたPython用のライブラリ
import boto3
from matplotlib import pyplot as plt
from PIL import Image
# 画像ファイルのパス
filename = r"※画像ファイルのパスを指定"
# 画像ファイルのサイズを取得する
img = Image.open(filename)
img_width = img.size[0]
img_height = img.size[1]
rekognition=boto3.client('rekognition')
with open(filename, 'rb') as f:
# DetectLabelsの呼び出し
res = rekognition.detect_labels(Image={'Bytes': f.read()})
# ラベル表示用のフォント
font_dict = dict(family="serif",
color="red",
weight="bold",
size=10)
for label in res["Labels"]:
label_name = label["Name"]
for instance in label["Instances"]:
bb = instance["BoundingBox"]
# 画像に枠を表示させる
rect = plt.Rectangle(
(bb["Left"] * img_width,
bb["Top"] * img_height),
bb["Width"] * img_width,
bb["Height"] * img_height,
fill=False,
edgecolor='red',
)
plt.gca().add_patch(rect)
# 画像にラベルを表示させる
plt.text(bb["Left"] * img_width, bb["Top"] * img_height
, label_name + " " + str(round(instance["Confidence"], 2)) + "%"
, fontdict=font_dict)
plt.grid()
plt.axis("off")
plt.imshow(img)
# 結果画像ファイルを保存
plt.savefig("result.png")
実行すると
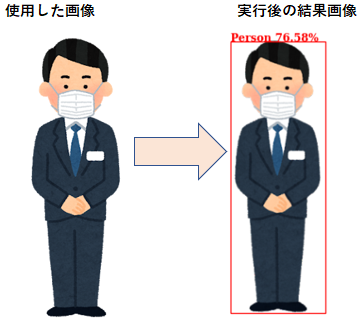
rekognition.detect_labelsで返却されたJsonの値をもとに、読み込んだ画像に枠線とラベルを出力し結果画像に保存されます。
※返却されたJson抜粋
{'Labels': [
{'Name': 'Person', 'Confidence': 79.16504669189453, 'Instances': [
{'BoundingBox': {'Width': 0.6389963030815125, 'Height': 0.958643913269043, 'Left': 0.1798168122768402, 'Top': 0.019761590287089348
}, 'Confidence': 76.58033752441406
}
{'Name': 'Person', 'Confidence': 79.16504669189453, 'Instances': [
{'BoundingBox': {'Width': 0.6389963030815125, 'Height': 0.958643913269043, 'Left': 0.1798168122768402, 'Top': 0.019761590287089348
}, 'Confidence': 76.58033752441406
}
実行した結果がこちらになります。

お問い合わせ - お気軽にお問い合わせください -

株式会社 パブリックリレーションズ 〒064-0807 北海道札幌市中央区南7条西1丁目13番地 弘安ビル5階 011-520-1800 011-520-1802
メールでのお問い合わせはこちら